Payments using the payment form
This scenario describes how to perform a payment to a bank card through the payment form. You should consider this option if you decided not to collect bank card details and not to store them on your side.
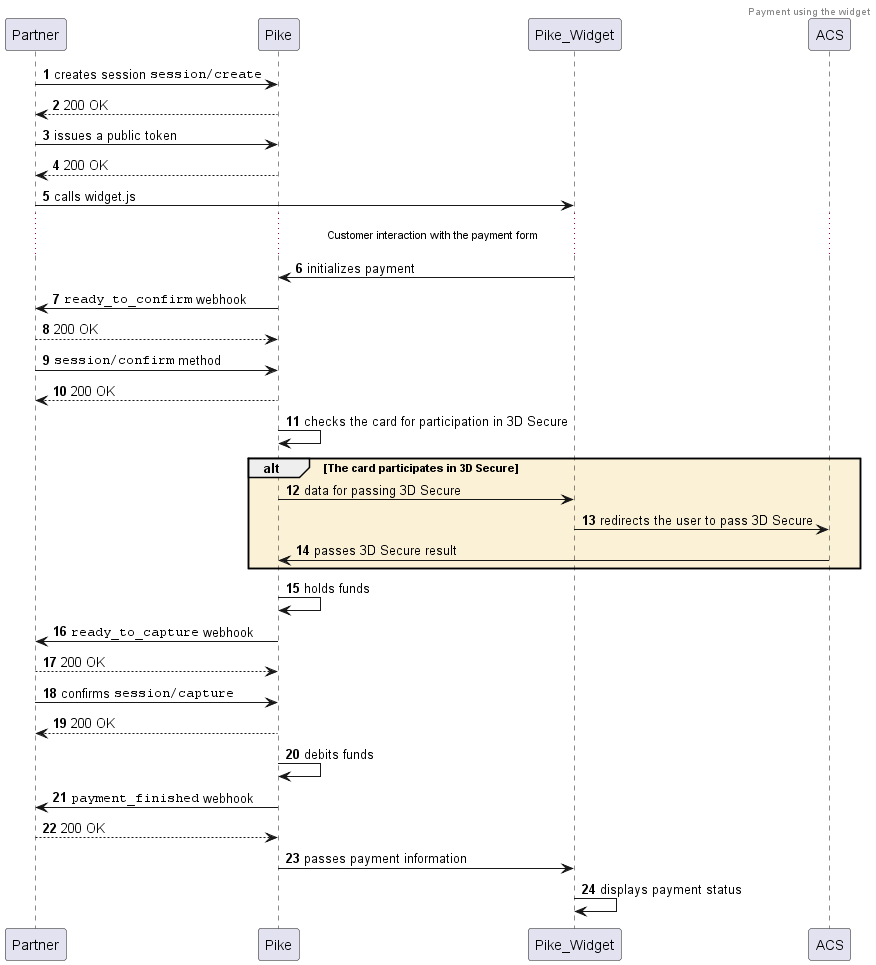
You can obtain tokenized card details using the payment form widget and then perform the payment securely.
This scenario does not include the payment capture step. How to make a delayed capture payment.
-
Create a session using the
session/createrequest.Pass your project identifier and signature in the request headers.
Example
curl -X POST \
  https://proxy-demo.pikepayments.com/api/v1/session/create \
  -H 'Content-Type: application/json' \
  -H 'X-PARTNER-PROJECT: your_project_name' \
  -H 'X-PARTNER-SIGN: signature' \
  -d '{
    "customer": {
      "reference": "user123",
        "contacts": [{
          "email": "user@gmail.com"
        }]
    },
    "amount_details": {
      "amount": 10000,
      "currency": "rub"
    },
    "metadata": "order123"
}' -
Send a
tokenrequest specifying the session identifier and the type of the widget you are going to call. You will receive a token in response.If you want to add the I agree to recurring payments checkbox to the payment form, specify
truein theshow_recurrent_checkboxfield. It is required if you want to perform recurring debiting.
Note that initially this checkbox can be either empty (by default) or preselected. If you prefer it to be preselected, please contact your Account Manager.Example
curl -X POST \
  https://proxy-demo.pikepayments.com/api/v1/token \
  -H 'Content-Type: application/json' \
  -H 'X-PARTNER-PROJECT: your_project_name' \
  -H 'X-PARTNER-SIGN: signature' \
  -d '{
    "acquiring_widget": {
      "session_id": "ps_123456"
    }
}' -
Show the payment form to the recipient. To do this, you need to access our JavaScript library and add the payment form widget.
-
Pike will send you a
ready_to_confirmwebhook. This means that the payment can be performed and Pike is waiting for you to confirm (or cancel) it.The webhook body will contain all the data needed for the payment.
Reply with the 200 HTTP code.
Example
curl -X POST \
  https://partner.ru \
  -H 'Content-Type: application/json' \
  -H 'X-PARTNER-SIGN: signature' \
  -d '{
    "type": "ready_to_confirm",
    "session": {
      "id": "ps_3230",
      "status": "in_progress",
      "created_at": "2024-05-27T02:03:00.000000Z",
      "updated_at": "2024-05-27T02:03:00.000000Z",
      "acquiring_payments": [{
        "id": "pm_2705",
        "status": "pending",
        "created_at": "2024-05-27T02:03:00.000000Z",
        "customer": {
          "reference": "user123",
          "contacts": [{
            "email": "user@gmail.com"
          }]
        },
        "payment_details": {
          "type": "card",
          "card": {
            "last4": "4242",
            "brand": "visa"
          }
        },
        "amount_details": {
          "amount": 10000,
          "currency": "rub"
        },
        "metadata": "good"
      }]
    }
}' -
Check the payment details and confirm that you are ready to perform the payment (using the
session/confirmrequest) or cancel it (using thesession/cancelrequest).If you receive an
action_requiredwebhook, send the HTTP 200 OK in response—the user will be redirected for 3D Secure within the widget.
Examples
- session/confirm
- session/cancel
curl -X POST \
  https://proxy-demo.pikepayments.com/api/v1/session/confirm \
  -H 'Content-Type: application/json' \
  -H 'X-PARTNER-PROJECT: your_project_name' \
  -H 'X-PARTNER-SIGN: signature' \
  -d '{
    "session_id": "3230"
  }'
curl -X POST \
  https://proxy-demo.pikepayments.com/api/v1/session/cancel \
  -H 'Content-Type: application/json' \
  -H 'X-PARTNER-PROJECT: your_project_name' \
  -H 'X-PARTNER-SIGN: signature' \
  -d '{
    "session_id": "3230"
  }'
-
Wait for a
payment_finishedwebhook. The webhook body will contain all the details of the payment. The result of the payment can be found in thestatusfield of theacquiring_payments/payment_listarray.If the status is
succeeded, then the payment was successful.
Diagram for payment via payment form